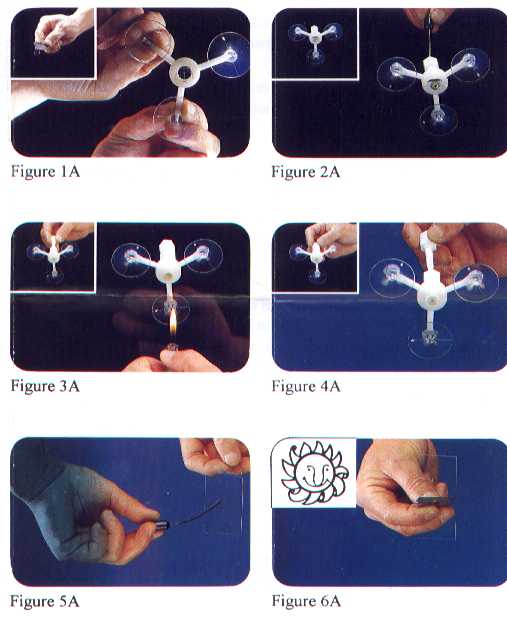
1) Figure 1A
Affix the applicator base to the windshield, Make sure the center ring is centered above
the point of impact of the damaged area and the suction cups are firmly attached to the
windshield. If possible, do not allow the suction cups to cover any cracked areas. 2) Figure 2A
Screw the hallow tube into the center ring. Make sure the mouth of the rubber end is
directly on top of the point of impact of the damaged area. Screw down until the rubber
mouth of the tube is pressed firmly against the windshield. If too much pressure is
applied, further cracking may occur. Squeeze 5-10 drops of the bonding agent (depending on
the extent of damage) into the hollow tube already mounted in place on the windshield.
Screw the pressure head into the hollow tube to drive the bonding agent into the damaged
glass. Tighten until the outer edges of the rubber end begin to separate slightly from the
glass.This can be verified from inside the car.
3) Figure 3A
Allow the banding agent time to be absorbed into the crack (4-6 minutes depending on the
extent of the damage). If the bonding agent does not reach all areas of the damage, apply
heat on the inside of the windshield with a lighter (not included). Move the flame from
the center of the damage very slowly outward along cracks. Do not apply the flame to one
part of the glass for longer than three second intervals. Retighten the pressure head to
push the bonding agent further into the damaged glass.
4) Figure 4A
Unscrew and remove the pressure head from the hollow tube to release any air. To determine
if the bonding agent has been absorbed into cracks, look at the glass from an angle of
about 45 degrees. In the case of chips or bull's eyes, examine the glass from directly
behind the damaged area. Unrepaired areas will appear as dark areas. If there is any
damage still visible, repeat Step 3 until satisfactory results are achieved.
5) Figure 5A
Remove the entire apparatus by lifting up on the small tabs on the suction cups. Gently
wipe away any excess bonding agent. Add a small drop of the bonding agent onto any areas
where damage is still visible and cover with a sheet of the curing film for the finishing
touches.
6) Figure 6A
After allowing the bonding agent to dry completely (about 5-10 minutes of direct sunlight
or UV light), gently remove the curing film. Scrape away the excess bonding agent with the
razor blade. For best results, hold the razor blade at a 90 degree angle to the windshield
when scraping. |


